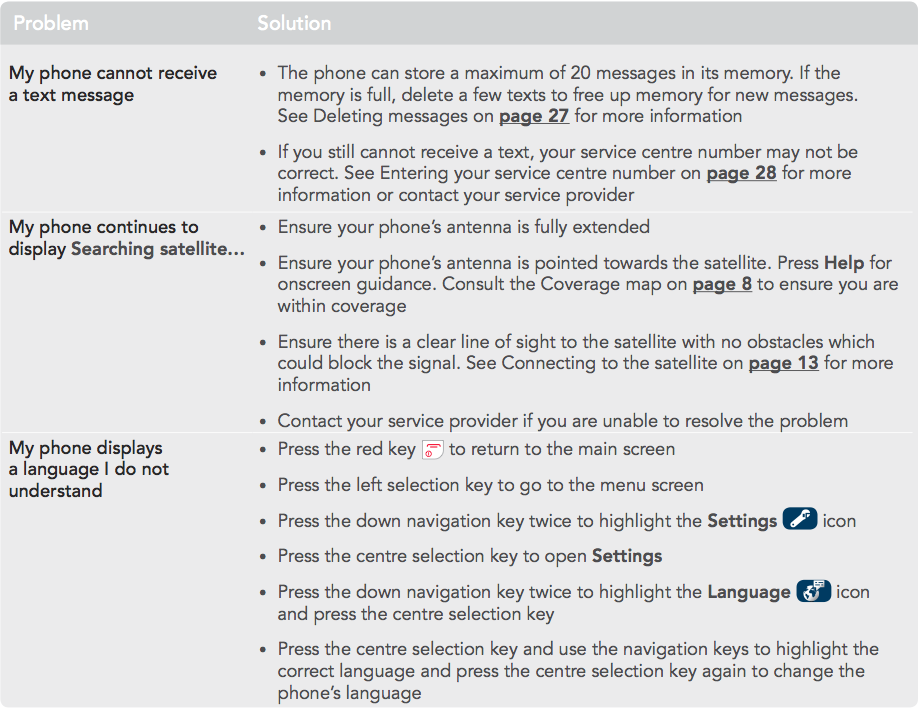
If you receive a CME_Error Code, use this table for a cross reference.
Obtain a new GPS fix before registering with the network.
The BGAN terminal needs a GPS fix in order to register with the BGAN network.
Take the terminal outside, and lay it down flat with a clear view of as much of the open sky as possible. The GPS system is relatively tolerant of atmospheric conditions such as heavy cloud or rainfall. However, note that physical blockages, such as tall buildings can significantly degrade the ability of the GPS receiver to obtain a fix.
It should take no more than 5 to 10 minutes to obtain a fix. Check the terminal to see if you have a valid GPS fix.
• On the HNS 9201, the GPS LED lights solid green when you have a valid GPS fix.
• On a Thrane & Thrane EXPLORER terminal, enter the PROPERTIES > GPS STATUS menu on the terminal’s display and keypad. If the terminal has a GPS fix, and the position can be displayed, the latitude and longitude details are shown. If the terminal has a GPS fix, but the position cannot be displayed, the word ACQUIRED is displayed. If the terminal is still searching for a GPS fix, the almanac data is displayed as a series of vertical bars giving the status of 16 GPS satellites.
• On the Nera 1000/1010, the Signal LED lights solid green when you have a GPS fix.
You must install a SIM card into the terminal before you can register with the network NOTE: Check that the gold contact strip of the SIM card is in contact with the SIM connectors on the terminal. Make sure the SIM card is flat against the terminal’s connectors.
NOTE: Handle the SIM card carefully, as damage to the gold contact strip can affect performance.
SIM card not provisioned. The SIM card you install must be correctly provisioned for use on the BGAN network. To check that it is correctly provisioned, contact your Service Provider.
It is vital that you point the terminal as accurately as possible.
Establishing a connection with the BGAN network requires the careful orientation of the BGAN terminal towards the satellite, a process called pointing. Accurate and precise pointing is important, because a badly-pointed antenna may mean you cannot register with the BGAN network, and will reduce the data rate achievable over the network.
To point accurately, ensure clear line of sight: obstacles such as buildings, mountains, trees and vehicles will reduce your signal strength. Also, be aware when pointing a terminal through a window that many windows in offices, hotels and so on have a metallic finish to the glass which will also affect signal strength. Where possible, position the terminal outdoors.
NOTE: During pointing, the location shown on the coverage map in BGAN LaunchPad is based on your previous location, or one that you entered yourself. The coverage map displays your current GPS position only after you are registered with the network. Your current city location only updates after you next register with the network.
NOTE: On the HNS 9201, if your terminal tries to register automatically on start up, you may have automatic registration configured. If you have moved your terminal since you last registered, turn off automatic registration, and re-point the terminal manually.
What is the minimum signal strength I require for registration?
The typical minimum signal strength required to register on the BGAN network is as follows:
HNS 9201 49 dBHz
Thrane & Thrane EXPLORER 300, 500, 700 46 dBHz
Nera WorldPro 1000/1010 41 dBHz
If you are connected to BGAN LaunchPad, check the signal strength on the status bar. You can also use the LEDs or the display on the terminal to monitor signal strength. The amount and type of information provided depends on the terminal.
HNS 9201: CME_30 “The network request cannot be granted. The network is not available at this time. Try again later.”
Thrane & Thrane EXPLORER terminal: CM_133 ” The network request Cannot be granted
Nera WorldPro 1000/1010: JDUN_0734 ” The PPP link control protocol was terminated.
Possible Cause: Incorrect APN Selected
An Access Point Name (APN) identifies the external network that is accessible from a terminal. By default, the SIM Card in your terminal is configured with the APN of your Service Provider, and the terminal reads this information from the SIM card. If you can’t make an IP data connection, it may be that an incorrect APN is being used by the terminal.
To check that the correct APN is being used, in BGAN LaunchPad select BGAN Services > LaunchPad APN Options. T he APN that is currently being used is displayed in the APN Configuration screen.
To make sure this is the correct APN for your SIM card, select Fetch from SIM. Click on OK and try making the IP data connection again. If you still can’t make an IP data connection, check that the individual connection is set to the default APN. To do this, select the Data tab, right-click on the data icon that you want to check and select Edit. Then select the Routing tab, and make sure that default it selected in the Select APN drop-down list. Click on OK, and try making the IP data connection again.
Below you will find the different Inmarsat and DP (Distribution Partner) APN and DNS server information:
|
Provider / APN |
DNS Server |
| Inmarsat | |
| BGAN.INMARSAT.COM (EMEA Region) | Primary DNS: 172.30.66.7 / 172.30.34.7 |
| BGAN.INMARSAT.COM (APAC/AMER Region) | Primary DNS: 172.30.194.8 / 172.30.194.11 |
| Stratos (Now owned by Inmarsat) | |
| STRATOS.BGAN.INMARSAT.COM | Americas Region DNS: 212.165.65.67/212.165.65.70 |
| XANTIC.BGAN.INMARSAT.COM | EMEA Region DNS: 212.165.108.67/212.165.108.70 |
| Hong Kong DNS: 180.94.48.67 / 180.94.48.70 | |
| ASBC Global (formerly Vizada/France Telecom) | |
| VIZADA.BGAN.INMARSAT.COM |
Primary: 10.10.109.12/ 10.10.102.152 |
| TELENOR.BGAN.INMARSAT.COM |
|
| VIZADA-USA.BGAN.INMARSAT.COM | |
The dBm figure is the power related to a specific carrier bandwidth.(BW)
Normaly, for a carrier , this is the power in the 3 dB bandwidth.
If you use a spectrum analyser to measure the carrier power, you must make sure to use a resolution bandwidth which is greater than the carrier BW, but not so wide it takes in the power of any adjacent carrier.
With the digital spec. ana. it is possible to set up line markers to measure the total power between ther markes. (In the old days you had to use the calculator to figure this out)
A single forward bearer type has been chosen for use in the narrow beam. This bearer has a bandwidth of 189 kHz and uses 16 QAM modulation with a bit rate of 200-492kbps. (F80T4.5X)
If the C/N0 is 69.5 dBHz: (Bear in mind that this figure is (negative dB) -69,5 dBHz)
The power in the bearer is: -69.5 + (10log189K) => -69,5 + 52,7 = -16,7 dBm
Additional comments to the discussion dBm and dBHz. The term log means logarithm with base 10. The acronym dB stands for deciBel. By Bel means the logarithm of a quantity. By deciBel means 10 times Bel. dBm is a logarithmic expression for power measured in milliwatt. Example: P=1 Watt is 1000 mW, or P=10*log(1000) dBm=30 dBm.
dBHz is a logaritmic expression for bandwidth. Example: If a communication system has a bandwidth of B=3.5 MHz (like UMTS) then this is 10*log(B)=10*log(3500000)=65.44 dBHz
A conversion between dBHz and dBm is not meaningful and I am not able to answer the question of conversion between dBHz and dBm
White Gaussian noise is often expressed as noise spectral densitydensity in watt/Hz. For example termal noise has a spectral density of N0=k*T W/Hz where k is the Bolzmanns constant k=1.38*10^-23 Ws/degK, and T is the temperature in deg. Kelvin. This could be expressed in a logaritmic scale in dBm/Hz. Thus at room temperature N0=1.38*10^-23 * 300 W/Hz or -174 dBm/Hz. If for instance the the bandwidth is 3.5 MHz, the noise level N0*B measured in dBm is -174dBm +65.44 dBHz=-108.5 dBm . In the latter example dBHz is used to find the nois power in a given bandwidth when the noise density is known.
Following the full deployment of the Inmarsat-4 (I-4) satellite constellation in 2009, a further three satellite regions were created over the Earth’s major landmasses.
Alphasat was launched in 2013 to supplement the I-4 network, at 24.9 degrees East.
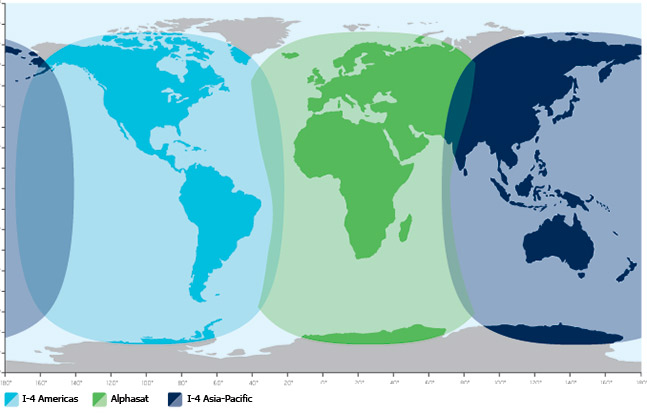
The Inmarsat-5 (I-5) satellites power our high-speed Global Xpress broadband service. Launched between 2013-2015, the constellation of three satellites covers the following regions:


Check the network connections settings for your operating system.
The connection to the terminal should be the only active connection. (In normal operation, it is best to have only one active connection.)
To check this:
• On a Windows PC, select Start > Control Panel > Network Connections. If you see an open connection other than the terminal connection, right-click on the connection and select Disable.
• On a Mac, simply make sure that the wireless and Bluetooth interfaces are disabled.
When you connect the USB cable from the terminal to your computer, your operating system automatically discovers the terminal as new hardware. Follow the on-screen Wizard to install the terminal.
On the EXPLORER 300, 500, or 700, and Nera WorldPro 1000/1010 (Windows PC only) – To check that the installation of USB drivers on your computer was successful, display the list of modems on your operating system. To do this:
On the HNS 9201 – To check that the installation of USB drivers on your computer was successful, connect to the terminal and look for the IP address 192.168.128.100. To do this:
You can test your Ethernet connection by attempting to ping the IP address of the terminal from your computer. If you receive a reply, the terminal is connected.
The IP address of each terminal is as follows:
HNS 9201 = 192.168.128.100
Thrane & Thrane
EXPLORER 300, 500, 700 = 192.168.0.1
Nera WorldPro 1010 = 192.168.0.1
To ping the IP address from your computer:
• On a Windows PC, select Start > Run, in the Run dialog box type cmd and click OK. At the command line prompt type ping x.x.x.x, where x.x.x.x is the IP address for your terminal (see the table above). If you see the message Reply from x.x.x.x, the Ethernet connection is active.
• On a Mac, select Finder > Applications > Utilities > Network Utility > ping. In the text box type in the IP address for your terminal (see the table above). If you see the message Reply from x.x.x.x, the Ethernet connection is active.
Make sure you use a straight-though cable to connect the terminal to your computer. A suitable straight-through cable is supplied with your terminal. A cross-over cable is not suitable for connecting the terminal to your computer.
Check the network connections settings for your operating system. The Ethernet connection must be enabled. To check this:
• On a Windows PC, select Start > Control Panel > Network Connections. Look for the Ethernet (or Local Area Network) connection, and make sure it is connected. If it is not, right-click on the icon and select Enable.
• On a Mac, check your Network settings, and make sure Built-in Ethernet is enabled.
NOTE: If more than one network connection is open, refer to section 1.9 “Is more than one network connection open?”
To check that these settings are configured on your computer, refresh your IP address.
To do this:
NOTE: Rebooting your computer is another way of renewing the IP address.
For the Ethernet interface to work without any further setup, your computer must be configured to obtain an IP address and a DNS server address automatically. You can do this by refreshing the computer’s IP address.
NOTE: The settings from a previous network connection can sometimes be stored on your computer. Refresh the computer’s IP address to clear the previous settings. NOTE: Some corporate computers may be configured with a static IP address and DNS settings.
Possible causes could be:
Check the network connections settings for your operating system.
The connection to the terminal should be the only active connection. (In normal operation, it is best to have only one active connection.)
To check this:
• On a Windows PC, select Start > Control Panel > Network Connections. If you see an open connection other than the terminal connection, right-click on the connection and select Disable.
• On a Mac, simply make sure that the wireless and Bluetooth interfaces are disabled.
Make sure that the wireless mode (802.11a/b/g) of your wireless card is supported by the terminal, and that the terminal is configured for the required wireless mode.
• The HNS 9201 supports 802.11b mode only.
• The EXPLORER 700 supports 802.11a/b/g, but you must select the required mode on the terminal using BGAN LaunchPad.
Check the network connections settings for your operating system.
The connection to the terminal should be the only active connection. (In normal operation, it is best to have only one active connection.)
To check this:
• On a Windows PC, select Start > Control Panel > Network Connections. If you see an open connection other than the terminal connection, right-click on the connection and select Disable.
• On a Mac, simply make sure that the wireless and Bluetooth interfaces are disabled.
This section applies to the EXPLORER 300, EXPLORER 500, EXPLORER 700 and Nera WorldPro 1000/1010.
• By default, the Bluetooth interface is disabled. To enable the interface, in BGAN LaunchPad go to Terminal > Bluetooth Interface Settings, and click on Enable.
• The terminal supports various Bluetooth profiles. Remember to activate/install the profile(s) you are going to use on your computer. For a list of supported profiles, refer to the documentation supplied with your terminal.
• The Bluetooth device should be placed within a specified maximum distance of the terminal. The maximum distance varies depending on the terminal. Note that this is the maximum distance in open air; the actual distance may be shorter, depending on the environment.
Note: Refer to the documentation supplied with your terminal.
Inmarsat recommends that you use BGAN LaunchPad to manage the BGAN terminal. You can install BGAN LaunchPad onto your computer from our website, and use its in-built Wizard to point the terminal to the BGAN satellite and register with the network.
Once registered, you can use BGAN LaunchPad to open and close data connections, send and receive text messages, and manage phone operations, as well as manage the terminal interfaces, monitor status and usage and access support services.
The other options you have for managing the terminal are as follows:
EXPLORER 300, 500, and 700 – use the terminal’s display and keypad to carry out registration and manage terminal operations.
EXPLORER 300, 325, 500, 525, 700, and 727 – Use the built in web interface to manage the terminal configuration and settings. To open this, connect to the terminal, then simply type the terminal’s IP address (192.168.0.1) into your web browser. Refer to the User Manual supplied with your terminal for guidance.
Nera 1000/1010 – if you have a Nera WorldSet, you can use the front panel indicators and buttons to manage some terminal operations. You can also utilize the built in web interface by using your default web browser and navigating to the terminal’s IP address (192.168.0.1).
Hughes 9201, 9202, 9450, 9350, and 9502 terminals can managed through front panel connections (if present on model) or through the built in web interface by using your default web browser and navigating to the terminal’s IP address (192.168.128.100)
Remote Management allows the unit to receive and act on special remote control SMS messages.
To access this feature page, open a standard internet browser, and enter 192.168.128.100 in the address field. Then, click on Security Icon at the top of the GUI. If enhanced security is already enabled, you will need to know the Administrator password to access any features.
SMS Remote Control Off by default. On/Off radio button
default is remote (case sensitive). If the Enhanced Security feature is enabled, the password will be displayed encrypted.

The BGAN terminal needs a GPS fix in order to register with the BGAN network.
Take the terminal outside, and lay it down flat with a clear view of as much of the open sky as possible. The GPS system is relatively tolerant of atmospheric conditions such as heavy cloud or rainfall. However, note that physical blockages, such as tall buildings can significantly degrade the ability of the GPS receiver to obtain a fix.
It should take no more than 5 to 10 minutes to obtain a fix. Check the terminal to see if you have a valid GPS fix.
• On the HNS 9201, the GPS LED lights solid green when you have a valid GPS fix.
• On a Thrane & Thrane EXPLORER terminal, enter the PROPERTIES > GPS STATUS menu on the terminal’s display and keypad. If the terminal has a GPS fix, and the position can be displayed, the latitude and longitude details are shown. If the terminal has a GPS fix, but the position cannot be displayed, the word ACQUIRED is displayed. If the terminal is still searching for a GPS fix, the almanac data is displayed as a series of vertical bars giving the status of 16 GPS satellites.
• On the Nera 1000/1010, the Signal LED lights solid green when you have a GPS fix.
It is vital that you point the terminal as accurately as possible.
Establishing a connection with the BGAN network requires the careful orientation of the BGAN terminal towards the satellite, a process called pointing. Accurate and precise pointing is important, because a badly-pointed antenna may mean you cannot register with the BGAN network, and will reduce the data rate achievable over the network.
To point accurately, ensure clear line of sight: obstacles such as buildings, mountains, trees and vehicles will reduce your signal strength. Also, be aware when pointing a terminal through a window that many windows in offices, hotels and so on have a metallic finish to the glass which will also affect signal strength. Where possible, position the terminal outdoors.
NOTE: During pointing, the location shown on the coverage map in BGAN LaunchPad is based on your previous location, or one that you entered yourself. The coverage map displays your current GPS position only after you are registered with the network. Your current city location only updates after you next register with the network.
NOTE: On the HNS 9201, if your terminal tries to register automatically on start up, you may have automatic registration configured. If you have moved your terminal since you last registered, turn off automatic registration, and re-point the terminal manually.
What is the minimum signal strength I require for registration?
The typical minimum signal strength required to register on the BGAN network is as follows:
HNS 9201 49 dBHz
Thrane & Thrane EXPLORER 300, 500, 700 46 dBHz
Nera WorldPro 1000/1010 41 dBHz
If you are connected to BGAN LaunchPad, check the signal strength on the status bar. You can also use the LEDs or the display on the terminal to monitor signal strength. The amount and type of information provided depends on the terminal.
The typical minimum signal strength required to register on the BGAN network is as follows:
HNS 9201 49 dBHz
Thrane & Thrane EXPLORER 300, 500, 700 46 dBHz
Nera WorldPro 1000/1010 41 dBHz
If you are connected to BGAN LaunchPad, check the signal strength on the status bar. You can also use the LEDs or the display on the terminal to monitor signal strength. The amount and type of information provided depends on the terminal.
When connected to the BGAN network, dial 57# or +870772001899. You will then be required to follow the recorded message. You will be asked to select a PIN number (4 characters or more), then you will be asked to leave your name. Finally you will be asked to set-up a greeting message.
When you receive a voicemail the network will send an SMS message to the terminal to inform you. You can then dial the short code 57# to pick up your voice mail message.
Full Voicemail Procedures/Wording Below.
“Good afternoon. Before you can use your mailbox, you have to do some initial settings.”
“Let’s do that now. Please enter your new PIN followed by the pound key.
Your PIN must be 4 digits. If you make a mistake, press star 3 to start again.”
(Enter PIN number followed by the pound key)
“Enter it again please.”
“Your PIN has been changed. To start using your mailbox, you must record your name. Let’s do that now. Press the pound key when you have finished.”
(Record your name and then press the pound key)
“If you’re happy with the recording, press 1. To hear it, press 2. To re-record your name, press 3.”
(Press 1 to continue)
“To start using your mailbox you must to record your name, let’s do that now. Press the pound key, when you have finished.”
(Record your name and then press the pound key)
“If you’re happy with the recording, press 1. To hear it, press 2. To re-record your name, press 3.”
(Press 1 to continue)
“Okay, name recorded. To start using your mailbox you must record the greeting for all calls. Let’s do that now. Press the pound key when you have finished.”
(Record your greeting message and then press the pound key)
“To use this greeting, press 1. To hear it, press 2. To re-record the greeting, press 3.
(Press 1 to continue)
“This greeting is now active. Welcome to messaging services. No new messages. No saved messages. Main menu. To work with your greetings, press 3. To change your mailbox settings, press 4. If you need more time, press 8.”
That is the complete voice mail set-up procedure. Please note the ‘pound key’ refers to the # (hash) key. The blue text indicates user interaction.
try to use the “DUN” that Launchpad has created to “dial” the network (phone no = *98#) to see if it connects. (LaunchPad is using one port for communication with the terminal, and one port for the USB modem (connecting to network).
Below you will find the different Inmarsat and DP (Distribution Partner) APN and DNS server information:
|
Provider / APN |
DNS Server |
| Inmarsat | |
| BGAN.INMARSAT.COM (EMEA Region) | Primary DNS: 172.30.66.7 / 172.30.34.7 |
| BGAN.INMARSAT.COM (APAC/AMER Region) | Primary DNS: 172.30.194.8 / 172.30.194.11 |
| Stratos (Now owned by Inmarsat) | |
| STRATOS.BGAN.INMARSAT.COM | Americas Region DNS: 212.165.65.67/212.165.65.70 |
| XANTIC.BGAN.INMARSAT.COM | EMEA Region DNS: 212.165.108.67/212.165.108.70 |
| Hong Kong DNS: 180.94.48.67 / 180.94.48.70 | |
| ASBC Global (formerly Vizada/France Telecom) | |
| VIZADA.BGAN.INMARSAT.COM |
Primary: 10.10.109.12/ 10.10.102.152 |
| TELENOR.BGAN.INMARSAT.COM |
|
| VIZADA-USA.BGAN.INMARSAT.COM | |
A standard connection is charged by amount of data transmitted. The bandwidth you are allocated depends on terminal type and network availability, but is always `best effort¿, that is, you are allocated bandwidth depending on your requirements and the requirements of other users of the BGAN network, or BGAN terminal. This connection class is suitable for most data types, other than multimedia.
A Traffic flow template, also called an application template, is a series of data filters such as CoS (Class of Service), PDP context and security settings, that allow the GPRS core network to classify packets received from an external network into the correct PDP context. When incoming data arrives at an access point in the core network, a packet classifier will make a PDP context selection based on the traffic flow template, and map the incoming data packets into the PDP context with the correct CoS attributes. The use of a traffic flow template allows multiple PDP contexts to be associated with the same PDP address.
Wireless Networking
The Dawn of the Wireless Renaissance It’s Time to Go Wireless!
Although we’re constantly hearing about the miracle of wireless technology, we’re merely at the dawn of the Wireless Renaissance. From Auckland New Zealand to Mt. Everest, Internet cafes and other wireless hot spots dot our increasingly interconnected globe (yes, there really is an Internet Café at a Mt. Everest base camp), but the best and most ingenious use of this breakthrough innovation is yet to come. For now, the wireless gold standard is 802.11g – – the newest, fastest and most powerful 802.11 radio technology that broadens bandwidths to 54 Mbps within the 2.4 GHz band. Because of backward compatibility, older and slower 802.11b radio cards can interface directly with an 802.11g access point and vice versa at 11Mbps or lower, depending upon range. We’ve come a long way, baby – just in the past couple of months. That’s how rapidly the wireless net that will someday encompass the entire globe is morphing. Much quicker than we write these words, technicians are gleaning new ideas that will revolutionize the way we communicate. From Marconi (the inventor of wireless communication back in the late 19th Century) to 802.11g – the sky is not the limit for how far we will take the wireless renaissance – it was merely a suggestion that we rejected long ago.
Rating the 802.11 Wireless Standards In 1997, when the Institute of Electrical and Electronics Engineers (IEEE) created the first WLAN standard they called it 802.11. Because it could only support a maximum bandwidth of 2Mbps – far too slow for most of today’s applications – ordinary 802.11 wireless products are no longer being manufactured. The next wireless incarnation was 802.11b, which supports bandwidths of up to 11Mbps, followed by the creation of 802.11g, which supports bandwidth up to 54 Mbps and signals in a regulated 5 GHz range. While 802.11g is the fastest wireless technology, is it the best for your home or business? Here is a brief synopsis of the three primary 802.11 standards:
The Evolution of 802.11 Wireless Technology
Why Connect? According to International Data Corp. (IDC), about half of all U.S. households have a computer, and a much higher percentage of businesses use PCs. Tens of millions of these homes and businesses have more than one computer one. In fact, market research shows that current PC owners buy most of the new computers. This means that multi-computer households are becoming increasingly more common. If you are one these multiple-PC owners, you have probably thought about how great it would be if your computers could talk to each other. With your computers connected, you could:
Advantages of wireless networking:
It’s fast (11 – 108Mbps). It’s reliable. It has a long range (5,000 feet in open areas, 250 to 400 ft / 76 to 122 m in closed areas) It’s easily integrated into existing wired-Ethernet networks. Virtually all 802.11g wireless networking products work with each other no matter what brand or model. Wireless offers Ethernet speeds without the wires. Access points vary greatly in cost, from about $59.99 to $1,400. Access points have an integrated Ethernet connection to connect to an existing wired-Ethernet network or routers provide connectivity to a high-speed data connection (DSL or cable modem). It also has an omni-directional antenna to receive the data transmitted by the wireless transceivers. Integrating PCs and Apple systems on the same network is also possible with the 802.11g standard. The majority of wireless network adapters used are in PCMCIA card form. But some manufacturers do offer USB adapters or PCI format cards. The cost per card ranges from $39 to more than $300. They are not typically sold in “do-it-yourself” kits. Instead, everything is a la carte, allowing customers to build a system that exactly meets their needs.
For businesses, the benefits of wireless technology are dramatic; we are not using hyperbole when we assure you that it will revolutionize your company. A wireless infrastructure makes it easier for you to adapt your office space as your company evolves. And the productivity gains you will reap dwarf the relatively inexpensive cost of setting up a wireless local area network (LAN). Here are the primary benefits your business will receive by going wireless:
It’s Not as Complicated as You Think! Most people think that networking your home or small office can be painful, with lots of wires, connections and other challenges. Plus, you have to make everything talk to each another. Don’t fret, because it’s not as much of a challenge as you might think. With most people using Microsoft Windows operating systems, networking has been built-in since Windows 3.11. Introduced in Windows 98, “Internet Connection Sharing” is a standard part of the operating system, allowing one computer to share an Internet connection with all computers on the home network. So, if you are running Windows, you can share files, printers and resources across your network without too much of a hassle. Following are 3 easy steps that will allow even a novice to setup a wireless network.
Wireless Networking Made Simple 3 Easy Set Up Steps Even the Novice Can Master
1. Plan Your System – Before you dive into the wireless world, make sure you know what lies ahead of you. Make a thorough analysis of your networking needs, what you need to accomplish, and what you expect to receive as a reasonable return on your investment. Assess your networking needs; determine how many workstations you’ll need to connect and where you can best utilize them. Also, take an inventory of what upgrades you will have to make to your existing computer equipment and decide what equipment you will need to purchase. These are the types of devices required for your wireless network:
2. Setting Up Your System – Now that you have a plan in place that defines exactly what your equipment needs will be, how you will configure your network and what goals you expect to accomplish with wireless technology, it’s time to set up your network. Before you take this step (don’t worry, it’s much easier than it seems), you must develop a good working understanding of the equipment involved in a wireless network. Wireless LAN equipment consists of wireless clients – the notebook computers, printers or handheld devices that can communicate over a wireless LAN – and access points, which are the points that accept the wireless radio signals and then connect the LANs. Your access point is the central communications point for your computers. These Now it’s time to build the wireless LAN! Again, don’t panic – you will be amazed how simple it is. Here is what you have to do:
3. Implement security measures to protect the integrity of your wireless network – Remember, wireless communications transmit through the air rather than over a closed capable. Therefore, maintaining security over your system requires measures that are specific to wireless. Wireless security solutions include Media Access Control (MAC), WEP encryption and Traditional VPN (Virtual Private Network) securities controls. Following are brief summaries of these solutions:
Three simple steps – that’s all it takes to join the wireless revolution – along with a relatively small investment in new technology that you will recoup many times with your exponentially improved efficiency and streamlined operation. We have the expertise, incomparable product line and unparalleled pricing to help you become experience all the advantages of benefits of wireless technology.
A concentrated area offering coverage within the global footprint for particular regions in the world.
Stands for “Public Switched Telephone Network” which is the infrastructure that carries public telephone service across the globe.
A virtual private network (VPN) enables remote offices or users to gain secure access to their organization’s network over the public telecommunications network. This provides the benefits of remote access without the expense of dedicated leased or owned lines. VPNs work by using tunneling protocols, such as L2TP, to encrypt data at the sending end, and decrypt the data at the receiving end. This “tunnel” cannot be accessed by data that is not properly encrypted.
Your Distribution Partner supplies you with a subscriber identification module (SIM) Card or a Universal Mobile Telecommunications System Subscriber SIM (USIM) card. A SIM or USIM Card is a card commonly used in a GSM phone. The card holds a microchip that stores information and encrypts voice and data transmissions, making it extremely difficult to listen in on calls. The USIM card also stores data that identifies the caller to the Distribution Partner.
The rate at which streaming data is transmitted, in kilobytes per second (kbps). This rate applies to transmitted (uplink) and received (downlink) data. Desired symmetrical rate – From the drop-down list, choose the desired data rate for your Streaming connection. This can be 32kbps, 64kbps, 128kbps or 256kbps. This figure is guaranteed, unless the connection cannot meet this requirement because of bandwidth restrictions. In this case the rate defaults to the minimum symmetrical rate. Minimum symmetrical rate – From the drop-down list, choose the minimum data rate that you are prepared to accept for your Streaming connection. This can be 32kbps, 64kbps, 128kbps or 256kbps. This rate must be lower than the desired symmetrical rate. If the connection cannot meet this requirement, an error message displays.
A streaming connection is charged by time. You are charged for the amount of time the connection is active. Streaming enables multimedia data, such as video, to be sent in a continuous data stream and converted into sound and pictures. The bandwidth required for a streaming connection is difficult to predict, and depends on factors such as length of connection and number of receivers.
Class of Service (CoS) assigns a level of priority to certain types of data traffic, in particular high bandwidth applications such as video and multimedia. CoS attempts to maintain a guaranteed throughput level, and minimize error rates and end-to-end latency, so providing a higher level of service than “best effort” protocols.
Your Service Provider supplies you with a Subscriber Identification Module (SIM) Card or a Universal Mobile Telecommunications System Subscriber SIM (USIM) Card. A SIM or USIM Card is a card commonly used in a GSM phone. The card holds a microchip that stores information and encrypts voice and data transmissions, making it extremely difficult to listen in on calls. The USIM Card also stores data that identifies the caller to the Distribution Partner.
An Internet Protocol address, or IP address, is a number that identifies the computer that is sending or receiving information transmitted over the Internet. An IP address is made up of four groups of numbers between 0 and 255, separated by periods. For example, 207.115.79.4 is an IP address. In the BGAN system, IP addresses can be dynamic or static. Dynamic IP Address – A dynamic IP address is a temporary address that is assigned by your Internet Service Provider (ISP) when you connect to the Internet. If you do not need a permanent IP address, Inmarsat recommends that you obtain a dynamic IP address. Normally, individual users of the Internet use a dynamic IP address. Static IP Address – A static IP address is assigned permanently, and is used every time you connect to the Internet. Normally, companies and other organizations that have their own networks use static IP addresses.
A Serving GPRS Support Node (SGSN) It is responsible for the delivery of data packets from and to the mobile stations within its geographical service area. Its tasks include packet routing and transfer, mobility management (attach/detach and location management), logical link management, and authentication and charging functions. The location register of the SGSN stores location information (e.g., current cell, current VLR) and user profiles (e.g., IMSI, address(es) used in the packet data network) of all GPRS users registered with this SGSN.
Gateway GPRS Support Node. (GPRS stands for General Packet Radio Services) . A GPRS Core Network provides mobility management, session management and transport for Internet Protocol packet
services in GSM and WCDMA networks. The core network also provides support for other additional functions such as billing and lawful interception. It was also proposed, at one stage, to support packet radio services in the US D-AMPS TDMA system, however, in practice, most of these networks are being converted to GSM so this option is becoming largely irrelevant. Like GSM in general, GPRS is an
open standards driven system and the standardization body is the 3GPP.
An Access Point Name (APN) identifies an external network that is accessible from a terminal. An APN has several attributes associated with it that define how you can access the external network at that point. By default, the SIM card in your terminal is configured with the APN of your Service Provider. You may want to configure further APNs if you have arranged with your Service Provider to use more than one SIM Card.
The domain name system (DNS) is an internet service that is required because the Internet does not recognize the text-based web address or e-mail address that you type into your Web browser or e-mail application. All or part of a web address or an e-mail address is a domain name, and DNS translates this domain name into an IP address that is recognized by the Internet. Dynamic DNS server – If you are using dynamic IP addressing, Inmarsat recommends that you use a dynamic DNS server. A dynamic DNS server updates the IP address information in the DNS database each time your IP address changes. A dynamic DNS server also enables a computer using a dynamic IP address to use network applications that normally require a static IP address, for example FTP servers. This service requires subscription with a Dynamic DNS provider. Static DNS Server – If you are using static IP addressing, Inmarsat recommends that you use a static DNS server. If you select this option, you must enter the IP address of the primary DNS server. This is supplied by your internet service provider. Optionally, you can enter the IP address of a secondary DNS server, also supplied by your ISP. This is used in the event of failure of the primary DNS server.
Error correction ensures that very little data is lost during transfer by asking for dropped packets to be re-sent. However, because it holds subsequent data whilst the packet is being re-sent, you may notice some jitter or delay in the received data. This is normal for most data types. For real-time applications, such as Voice over IP (VoIP) or video, you may find that the level of jitter or delay is too great. In this case, it is recommended that you remove error correction. Removing error correction minimizes delay and jitter, but note that a small amount of data may be lost during transfer, because dropped data packets are not resent.
A header is the component of a data packet that precedes the data that you are sending. The header contains information such as source and destination address, error checking and other administrative details. In most data types this does not noticeably affect the data transmission rates. However, in multimedia applications such as voice and video, the header can significantly affect performance. Inmarsat recommends that you switch on header compression for multimedia applications, such as video.
DO NOT REMOVE THE HANDSET FROM THE SATELLITE PHONE TERMINAL.
You may need to then power cycle the satellite phone terminal.
Next, if you plan on using the terminal for incoming calls, you may want to reset the Mobile Subscriber Number (MSN) to match the terminal you are using.
Check that you have including the country code and any required area or city codes.
Call barring of outgoing calls is not possible if any call diversion for voice is switched on.
Some call forwarding and call barring options may not be used at the same time. For example, enabling call divert of all calls and barring of all outgoing calls is not possible.
Diversion not set. See your manual and refer to Set call diversion
Phone pin entered three times incorrectly.
Enter PUK supplied with your SIM card as instructed.
If you have lost your PUK, call your service provider for assistance.
Service not authorized message — Call your service provider.
Mobile phone/battery is overheated. Let the mobile phone/battery cool down.
Mobile phone/battery is too cold. Allow the battery/mobile phone to warm up (e.g. in your pocket).
Wait until ’Normal Temperature’ is displayed.
Battery may be defective or the contacts on the battery or the phone are dirty.
After several years of average use, a gradual decline in battery life may be expected.
Check that the SIM card memory is not full.
Delete unused phone bood entries to make room.
Make sure that call divert is set to your voice mailbox number.
Verify your call diversion settings by following the instructions in section ’Diverting calls’.
Check that call barring is not active. Call diversion cannot be used when call barring is active.
1. Go To “Menu”
2. Select “GPS Manager”
3. Select “Current Position”
4. Upon reading the GPS Coordinates, press “Options”
5. Select “Save”
6. Select an empty location from the list, Press “select”
7. Enter a new name for your point 8. Press “Save”
Make sure no obstruction is blocking the satellite signal.
Make sure that your mobile phone has a clear view of the sky. If you are inside a building, tunnel, or other structure that limits your
view of the sky, the satellite signal may be weak or unavailable.
1. Try charging the battery, it could be drained. Check charging indication on display.
2. Battery contacts may be dirty. Remove the battery, cleant the contacts, and replace and try to power on.
3. See if phone will turn on while plugged into charging unit. If yes, then replace the battery with a new one, charge and use.
• Go to “Menu”
• Select “Settings”
• Select “SMS Parameter”
• Select “SMS Center”
Enter “+882161900000” as the SMS center number.
Inmarsat Fleet is the first new dedicated Inmarsat Maritime communications system since 1993, providing ocean going vessels with comprehensive global voice, data and fax communications. As with Inmarsat A and B, the service also provides voice distress and safety communications – with Inmarsat Fleet F77 now meeting the latest relevant IMO
GMDSS requirements. Inmarsat Fleet F77 is the first service in the Fleet family. Fleet terminals offer voice and data services in the Maritime sector. Details of
further services within the Fleet family, each aimed at specific sectors of the Maritime industry, will be announced by Inmarsat during 2002.
The number “77” relates to the approximate diameter of the antenna ( i.e.70-85cm). This places the Fleet F77 in the larger, deep-sea vessels market served until now by Inmarsat A and B. The first Fleet
family member, F77, is the premier service in this portfolio – as with Inmarsat A and B, the service includes Global maritime coverage, differentiating from other services such as Mini-M.
Inmarsat Fleet F77 ISDN provides a 64Kbps link (‘Euro ISDN’). N.B. As with any such connection, the actual speed of delivery depends on the slowest link between the user and the distant end, and the application used, which may deliver less than 64Kbps. AND, for Fleet 77 users, there is an upgrade to 128Kbps service available.
The MPDS channel is designed for on-line connectivity where a high-speed connection is not a key requirement. As with the Global Area Network service, this service is provided initially at an undefined bit-rate. Speed therefore depends on the number of users accessing the bearer at any one time. As and when required, the network will release new channels for usage, dependent on demand levels. As billing is no longer time-related, this is purely a user experience issue.
Inmarsat Fleet F77 is equipped with the widely successful Mini-M voice Codec, but of course providing a global service. o Very high quality (3.1Khz) voice also available on a separate channel but not widely required in practice in the Maritime market.
The GPS reception was incomplete. Make certain the unit has been turned on and pointed up into the sky to receive GPS signals from at least three different satellites.
Make certain the wireless ability of the HSN9201 has been enabled. Its default is disabled. To turn it on, connect the Ethernet cable between the laptop and the HSN9201. Launch Launchpad; when the connection is complete, left click on Terminal: left click on WLAN settings; left click on Enable. Since the HSN9201 can support several WIFI connections, choose 64K WEP with an ASCII password of five letters.
There are many pieces to this satellite phone and data network. Click below for a detailed guide for the Hughes HNS 9201 BGAN satellite phone and data modem.
Is the BGAN Launchpad software installed on your computer?
IF NO, install the software. Make certain it’s version 2.6.1
IF YES, proceed
Is the HSN9201 powered up?
IF NO, turn it on
IF YES, proceed:
Is the HSN9201 GPS light a solid green?
IF NO, lay the unit down flat and wait until the GPS light is solid green
IF YES, proceed
Is the HSN9201 pointed correctly?
IF NO, use the onboard audiovisual system to set the azimuth and angle of the unit to the highest-pitch sound and the most number of green lights on the unit.
IF YES, proceed
Is the HSN9201 connected with an Ethernet cable to a laptop with BGAN Launchpad software?
IF NO, make certain the Ethernet cable is firmly seated in the RJ-45 Ethernet port on the HSN9201 (the middle port) and the Ethernet port (RJ-45) port on the laptop computer.
IF YES, proceed
Is the BGAN Launchpad program open on your computer?
IF NO, launch the program
IF YES, proceed
Is the BGAN Launchpad program showing a connection to your HSN9201?
IF NO, double check that the Ethernet cable is securely inserted in both Ethernet ports.
IF NO, double check that the HSN9201 is still powered up by checking the lights on the top of the unit.
IF YES, proceed
Is the BGAN Launchpad program showing the HSN9201 is registered with the network?
IF NO, left click on the register with network button; a pop-up window will appear on screen to show the registration process; when it disappears, the middle lower display on the Launchpad will indicate that your unit is registered
IF YES, proceed
If you want to establish a Standard Data Connection do you see that icon?
IF NO, left click on the Data icon; after the screen has changed, left click on the Standard Connection button; wait for the icon to change to read Disconnect Standard—that means you’re connected
IF YES, proceed
Does the Standard Connection button change to indicate that you’re connected?
IF NO, double check the IP configuration; double check the APN

The BGAN User Terminal conforms to the standard Internet Protocol version 4 addressing using four byte IP addresses. The three interfaces that connect with the user’s Terminal Equipment (USB, Wireless LAN, and Ethernet) are bridged in the terminal and the bridged interface is assigned a fixed address of 192.168.128.100.
The satellite network interface, available through the BGAN stack, will be assigned an IP address that is either assigned dynamically by the UMTS network or is assigned statically through the Service Provider at the request of the End-User.
This is the IP address that the User Terminal is reachable over the air interface. This may be a private address of the DP as explained in diagram above.
The Hughes UT will use the IP address as an argument for PDP context activation. Otherwise, a dynamic IP address is requested in the PDP context activation request. The confirmation of the PDP activation will include the IP address that is assigned to the User Terminal (static or dynamic).
The flow of IP packets through the Satphone User Terminal involve several components described here.
In the outbound flow of traffic from the Terminal Equipment, a packet arrives at a UT network interface (USB, Wireless LAN, or Ethernet). The network interface receives the packet and passes it up the IP stack. The IP header is analyzed to determine the destination network interface that the packet is to be forwarded to.
The packet will match the default route in the routing table that will correspond to the satellite air interface. The forwarding function in the Hughes UT will pass the packet to the NAT module registered to the satellite air network interface. The NAT will maintain a mapping of to for each TE/PDP Context association.
The NAT modifies the IP header to substitute in the public IP address.
The packet is passed onto the UMTS interface driver.
The HNS-9201 will determine which PDP context the packet shall use to conform to the traffic flow template and quality of service requirements configured by the user.
The packet will then be passed to the Radio Access Bearer (RAB) for the proper PDP context for transmission over the BGAN satellite system.
The HNS-9201 will now pass the packet through the Packet Data Convergence Protocol (PDCP), Bearer Connection (BCn) Layer and the Bearer Control Layer (BCt) layers of the BGAN air interface protocol stack.
Incoming IP packets follows the same path as the outbound flow in the reverse direction.
The DHCP service allows hosts running on Terminal Equipment with DHCP clients to be configured automatically with a unique IP address upon connection to the UT. The DHCP server assigns an IP address on a lease basis.
The DHCP server implemented in the Hughes UT conforms to Internet Standard RFC 2131.
The dynamic local addresses assigned via DHCP or statically via the End-user, will be in the IP address range from 192.168.128.101 to 192.168.128.199.
Remote Management allows the unit to receive and act on special remote control SMS messages.
To access this feature page, open a standard internet browser, and enter 192.168.128.100 in the address field. Then, click on Security Icon at the top of the GUI. If enhanced security is already enabled, you will need to know the Administrator password to access any features.
SMS Remote Control Off by default. On/Off radio button
default is remote (case sensitive). If the Enhanced Security feature is enabled, the password will be displayed encrypted.
The iSatPhone Pro is capable of restricting incoming and outgoing calls through Call Barring.
Call barring
An IsatPhone Pro SIM card always uses an international number format, + or 00, and the country code, 870.
Call barring prevents the following call types from being made or received by your phone:
except from other Inmarsat numbers
If you are using a SIM card with local country numbering, the call barring is as described by the menu.
The first time you set up call barring, you will need to reset the barring password. Select Menu > Settings > Call settings > Call barring. Select Options and navigate to Change barring pass code. Enter the barring pass code and select OK. The default is 0000. Enter a new four-digit pass code and select OK. Then enter the new pass code again to confirm it.
You will need to enter this new pass code whenever you change your call barring settings.
To cancel a bar, highlight that type of call in the Call barring menu, select Options and select Cancel. To cancel all call barring, select Options and select Cancel all barring. To check the status of a call bar, highlight that type of call in the Call barring menu, select Options and select Check status.
Note: Fixed number dialling, Call barring and Call divert does not prevent emergency calling. Call barring and Call divert cannot be active at the same time.
Outgoing calls can be restricted from the phone using a feature called Fixed Number Dialling (FND) which allows you to restrict the number(s) dialed to a certain country, area code, or specific phone number(s).
Fixed number dialling (FND)
When Fixed number dialling is activated, the user is limited to dialling or texting only numbers stored in the FND list. The default setting is off.
Activating and de-activating fixed number dialling
Select Menu > Settings > Security, highlight Fixed dialling from the list and press the centre selection key. Select On to activate and press the centre selection key or OK. You will be prompted to enter your PIN 2 code. The default PIN 2 is 9999. See Setting up SIM PIN 2 code on page 46 of the User Manual for more information. Contact your service provider if this code was not specified or was reset at purchase.
To add a number to your list, select Menu > Contacts > FND list and press the centre selection key. Press Options and select either New FND contact or Copy from phonebook. You will then be prompted for the PIN 2 code.
FND list entries are stored on your SIM card. Only one name and one contact number can be stored for each entry.
Fixed number dialling can restrict your phone to a certain prefix, as well as individual phone numbers.
To limit outbound calls or text messages to a specific country or range of corporate numbers, create an FND list entry with the international prefix and local prefix you wish to allow, followed by the correct number of remaining digits replaced by question marks. Press the * key twice to enter a question mark.
Example: To limit calls to UK landlines, create an FND list entry: +44??????????. Substitute any number in place of the ? symbols while dialling or sending a message.
When fixed number dialling is activated, your phone still enables numbers stored in other areas of Contacts to be viewed.
Using fixed number dialling
Select Menu > Contacts > FND list and the contact. Select Call or Send message from Options.
To send email messages when fixed number dialling is activated, the message centre number should be added to the FND list. See Message settings on page 28 in the User Manual for more information on finding your message centre number.
Note: Fixed number dialling, Call barring and Call divert does not prevent emergency calling.
Fault code 117
Symptoms
Network connection failure – PDP rejected for unspecified reason. Reacquiring connection…
Causes
Network connection failure – unknown cause.
Troubleshooting and Resolution
If the problem continues, contact your Service Provider. Network may be down.
Fault code 2
Symptoms
SIM card read/write error. Power down and try again.
Causes
Failure to read from or write to the SIM card.
Troubleshooting and Resolution
Power down ThurayaDSL and try again. SIM card may be damaged. Visually inspect the SIM card and return it to your Service Provider if damaged. SIM card contacts may be dirty. Clean the SIM card contacts with a dry cloth. If the problem continues, replace SIM card with a known good SIM card. If the problem persists, return the unit to your Service Provider for service.
Fault code 3
Symptoms
SIM card access has been blocked. Please contact your Service Provider.
Causes
Failure to access the SIM card due to too many failed attempts with an invalid PIN.
Troubleshooting and Resolution
This occurs after 3 failed attempts to enter the PIN. The SIM card is locked. Enter the PUK to unlock the SIM card.
Fault code 4
Symptoms
SIM card has been improperly changed during an active session. Power down and try again.
Causes
You replaced a SIM card with another after the ThurayaDSL was turned on.
Troubleshooting and Resolution
The SIM card must be replaced when the unit is turned off. Make sure the unit is turned off before replacing the SIM.
Fault code 5
Symptoms
SIM card is not responding. Power down and try again.
Causes
Hardware failure to access the SIM card.
Troubleshooting and Resolution
Power down ThurayaDSL and try again. SIM card may be damaged. Visually inspect the SIM card and return it to your Service Provider if damaged. SIM card contacts may be dirty. Clean the SIM card contacts with a dry cloth. If problem continues, replace SIM card with a known good SIM card. If problem persists, return the unit to your Service Provider for service.
Fault code 7
Symptoms
You are not allowed to connect to the network. Please contact your Service Provider.
Causes
Network connection failure because the user is not allowed to connect to the Network.
Troubleshooting and Resolution
Your authorisation has been removed by your Service Provider (SIM card IMSI is not authorised). Contact your Service Provider to regain service.
Fault code 8
Symptoms
Your ThurayaDSL terminal is not allowed to connect to the network. Please contact your Service Provider.
Causes
Network connection failure because the ThurayaDSL is not allowed to connect to the Network.
Troubleshooting and Resolution
The ThurayaDSL authorisationhas been removed by your Service Provider (ThurayaDSL IMEI is not authorised). Contact your Service Provider to regain authorised service.
Fault code 9
Symptoms
You have no subscription, service is not allowed. Please contact your Service Provider.
Causes
Network connection failure because you are not identified as a subscriber to the service.
Troubleshooting and Resolution
Contact your Service Provider to receive authorised service. Your Service Provider should check the subscription entries in the Home Location Registry.
Fault code 10
Symptoms
This ThurayaDSL terminal was detached by the network. Cause unknown. Power down and try again.
contact your Service Provider.
Causes
Network connection broken with an unknown cause.
Troubleshooting and Resolution
Power down ThurayaDSL and try again. If the problem continues, contact your Service Provider.
Fault code 11
Symptoms
Network connection failure – Invalid parameters used for network attach procedure. Please contact your Service Provider.
Causes
Network connection failure due to use of invalid parameters.
Troubleshooting and Resolution
Contact your Service Provider.
Fault code 12
Symptoms
Network connection failure – LLC or SNDCP failure. Power down and try again.
Causes
Network connection failure caused by LLC or SNDCP failure.
Troubleshooting and Resolution
Power down ThurayaDSL and try again. If the problem continues, contact your Service Provider
Fault code 13
Symptoms
Network connection failure – Unknown PDP type. Please contact your Service Provider.
Causes
Network connection failure.
Troubleshooting and Resolution
Power down ThurayaDSL and try again. If the problem continues, contact your Service Provider.
Fault code 14
Symptoms
Network connection failure – User authorisation failed. Please contact your Service Provider.
Causes
Network connection failure because the user is not authorised for service.
Troubleshooting and Resolution
Contact your Service Provider to regain authorised service. Your Service Provider should check the subscription entries in the Home Location Registry.
Fault code 15
Symptoms
Network connection failure – Service option not supported. Please contact your Service Provider.
Causes
Network connection failure because the service option is not supported.
Troubleshooting and Resolution
Contact your Service Provider to regain authorised service. The Service Provider should check the subscription entries in the Home Location Registry.
Fault code 16
Symptoms
Network connection failure – Service option not subscribed. Please contact your Service Provider.
Causes
Network connection failure because user was not subscribed to the service option.
Troubleshooting and Resolution
Contact your Service Provider to regain authorised service. The Service Provider should check the subscription entries in the Home Location Registry.
Fault code 17
Symptoms
Network connection failure – N-SAPI has already been used. Power down and try again.
Causes
Network connection failure because network assigned an N-SAPI that is already being used.
Troubleshooting and Resolution
Power down ThurayaDSL and try again. If the problem continues, contact your Service Provider.
Fault code 18
Symptoms
Network connection failure – Regular PDP deactivation by network. Power down and try again.
Causes
The connection was deactivated by the Network.
Troubleshooting and Resolution
Power down ThurayaDSL and try again. If the problem continues, contact your Service Provider.
Fault code 19
Symptoms
Network connection failure – SM network failure. Power down and try again.
Causes
Connection failure due to SM network failure.
Troubleshooting and Resolution
Power down ThurayaDSL and try again. If the problem continues, contact your Service Provider.
Fault code 20
Symptoms
Network connection failure – Too many failures to activate PDP context. Power down and try again.
Causes
Too many failed attempts (4) to connect to the Network.
Troubleshooting and Resolution
This failure may occur because of a weak signal due to obstructions or geographic position (such as extreme latitude or longitude). Contact your Service Provider to verify coverage for your location.
Fault code 21
Symptoms
Network connection failure – Network assigned an invalid IP address. Power down and try again.
Causes
Assignment of an invalid IP address by the network during connection.
Troubleshooting and Resolution
Power down ThurayaDSL and try again. If the problem continues, contact your Service Provider. The Service Provider should verify that you have the correct network settings.
Fault code 22
Symptoms
Network connection failure – No response from network. Power down and try again.
Causes
Network connection failure due to lack of a response from the network.
Troubleshooting and Resolution
Power down ThurayaDSL and try again. If the problem continues, contact your Service Provider.
Fault code 23
Symptoms
Network connection failure – Protocol error received from network. Power down and try again.
Causes
Network connection failure due to a protocol error.
Troubleshooting and Resolution
Power down ThurayaDSL and try again. If the problem continues, contact your Service Provider.
Fault code 24
Symptoms
Network connection failure – GPRS stack could not attach to MUX interface. Power down and try again.
Causes
Internal software error.
Troubleshooting and Resolution
Power down ThurayaDSL and try again. If the problem continues, contact your Service Provider.
Fault code 26
Symptoms
IM card error – IMSI field is longer than 8 bytes and is invalid. Please contact your Service Provider.
Causes
SIM card may have been programmed incorrectly.
Troubleshooting and Resolution
SIM card was incorrectly programmed. The SIM card must be replaced by another from your Service Provider.
Fault code 27
Symptoms
GPRS software internal failure – GPRS stack message subscription failure. Please contact your Service Provider.
Causes
Internal software error.
Troubleshooting and Resolution
Power down ThurayaDSL and try again. If the problem continues, contact your Service Provider.
Fault code 28
Symptoms
Your PC has been disconnected from the ThurayaDSL terminal. Please reconnect your PC if you desire service
Causes
The connection between PC and ThurayaDSL has been removed, or The interface cable between PC and ThurayaDSL is not plugged in properly.
Troubleshooting and Resolution
Remove and reinsert the interface cable from both the PC and the ThurayaDSL. When done reboot the ThurayaDSL.
Fault code 25
Symptoms
Network connection failure – GPRS stack could not detach from MUX interface. Power down and try again.
Causes
Internal software error.
Troubleshooting and Resolution
Power down ThurayaDSL and try again. If the problem continues, contact your Service Provider.
Fault code 41
Symptoms
Your PC is opening large numbers of TCP connections (may be a virus generating connections). The ThurayaDSL terminal is running out of resources.
Causes
Applications (and possibly viruses) on your PC are generating excessive Internet connections.
Troubleshooting and Resolution
Check your PC for applications that may open large numbers of connections and disable these applications. If the problem continues, contact your Service Provider.
Fault code 42
Symptoms
TCP connection resources are depleted due to your PC opening excessive connections. You must restart your terminal to regain service to the network.
Causes
Excessive TCP connections by the PC have consumed all available connection resources in the terminal. The terminal cannot recover from this error.
Troubleshooting and Resolution
Clean up PC applications that are consuming excessive TCP connections. Power down ThurayaDSL and try again. If the problem continues, contact your Service Provider.
Fault code 101
Symptoms
You were detached by the network. The ThurayaIP terminal is attempting to reattach…
Causes
Connection broken by the Network.
Troubleshooting and Resolution
Power down ThurayaIP and try again. If the problem continues, contact your Service Provider.
Fault code 102
Symptoms
No network connection – User initiated detach from network.
Causes
The ThurayaDSL terminal has received detach confirmation from the network.
Troubleshooting and Resolution
If the problem continues, contact your Service Provider.
Fault code 103
Symptoms
Network connection failure – PLMN is not allowed. Reacquiring connection.
Causes
Network connection failure due to PLMN not allowed.
Troubleshooting and Resolution
If the problem continues, contact your Service Provider.
Fault code 104
Symptoms
Network connection failure – LA is not allowed. Reacquiring connection…
Causes
Network connection failure because ThurayaDSL is in a service not allowed Location Area (LA).
Troubleshooting and Resolution
If the problem continues in other areas where service is allowed, contact your Service Provider.
Fault code 106
Symptoms
Network connection failure – ThurayaIP terminal implicitly detached by the network. Reacquiring connection…
Causes
Network connection failure because the ThurayaIP was implicitly detached by the Network.
Troubleshooting and Resolution
If the problem continues, contact your Service Provider.
Fault code 107
Symptoms
Network service is not available – Network resources not available. Reacquiring connection…
Causes
Network service not available due to lack of network resources.
Troubleshooting and Resolution
The spot beam is dark and cannot be illuminated for ThurayaDSL service. If the problem continues, contact your Service Provider.
Fault code 108
Symptoms
Network service is not available. Reacquiring connection…
Causes
Network service not available.
Troubleshooting and Resolution
The spot beam is dark and cannot be illuminated for ThurayaDSL service. If the problem continues, contact your Service Provider.
Fault code 110
Symptoms
Access to network is not available at the moment, ThurayaDSL terminal acquiring network…
Causes
Network service not available because cell access is barred.
Troubleshooting and Resolution
If the problem continues, contact your Service Provider.
Fault code 109
Symptoms
Network service is not available – No network. Reacquiring connection…
Causes
Network service not available.
Troubleshooting and Resolution
If the problem continues, contact your Service Provider.
Fault code 111
Symptoms
Network service is not available – Limited network service. Reacquiring connection…
Causes
Network service not available due to limited service.
Troubleshooting and Resolution
If the problem continues, contact your Service Provider.
Fault code 105
Symptoms
Network connection failure – Roaming is not allowed. Reacquiring connection.
Causes
You are using a SIM card from a carrier that does not have a roaming agreement with your Service Provider.
Troubleshooting and Resolution
If the problem continues with an authorised SIM card, contact your Service Provider.
Fault code 112
Symptoms
Network service is not available – Invalid position. Reacquiring connection…
Causes
Network service not available because the GPS position is not valid.
Troubleshooting and Resolution
You should verify that the ThurayaDSL has an open view of the sky to get a GPS fix. If the problem continues, contact your Service Provider.
Fault code 113
Symptoms
Network service is not available – Invalid position for the selected Service Provider. Reacquiring connection…
Causes
Network connection failure because the of an invalid GPS position.
Troubleshooting and Resolution
Verify that the ThurayaDSL has an open view of the sky to get a GPS fix. If the problem continues, contact your Service Provider.
Fault code 114
Symptoms
Network service is not available – Invalid position for selected RAI. Reacquiring connection…
Causes
The GPS fix does not match the selected Routing Area Information (RAI).
Troubleshooting and Resolution
You should verify that the terminal has an open view of the sky to get a current GPS fix. If the problem continues, contact your Service Provider.
Fault code 115
Symptoms
Network service is not available – Unknown cause. Reacquiring connection…
Causes
Network service not available – cause unknown.
Troubleshooting and Resolution
If the problem continues, contact your Service Provider.
Fault code 116
Symptoms
Network connection failure – Insufficient resources. Reacquiring connection…
Causes
Network connection failure due to insufficient resources.
Troubleshooting and Resolution
If the problem continues, contact your Service Provider. Network may be down.
Fault code 118
Symptoms
Network connection failure – Service option temporarily out of order. Reacquiring connection…
Causes
Network connection failure because service option is temporarily out of order.
Troubleshooting and Resolution
If the problem continues, contact your Service Provider. Network may be down.
Fault code 119
Symptoms
Network connection failure – PDP deactivated by network. Reacquiring connection…
Causes
Network connection failure.
Troubleshooting and Resolution
If the problem continues, contact your Service Provider. Network may be down.
Fault code 120
Symptoms
No network connection – User initiated PDP deactivation.
Causes
The ThurayaDSL was powered down while connected to the network.
Troubleshooting and Resolution
You will generally not see this code. In order for you to deactivate the PDP, you must power down the terminal. If the problem continues, contact your Service Provider.
Fault code 121
Symptoms
Network connection failure – Missing or invalid APN. Please provide correct information and try again.
Causes
Network connection failure because the APN is missing or invalid.
Troubleshooting and Resolution
Contact your Service Provider to get the correct network settings.
Fault code 122
Symptoms
Network connection failure – Rejected by GGSN. Please re-enter User ID/Password and try again.
Causes
Network connection failure due to rejection by the GGSN.
Troubleshooting and Resolution
Verify that your Service Provider User ID and password are correctly set on the Network Settings screen. If they are correct and the problem continues, contact your Service Provider.
Fault code 123
Symptoms
Network connection failure -Subscribed QoS rejected by network. Please modify parameters and try again.
Causes
Network connection failure because the requested QoS was rejected by the Network.
Troubleshooting and Resolution
Modify the QoS settings and try again. If the problem continues, set all QoS settings to the default values and try again. If the problem continues with the default values, contact your Service Provider.
Fault code 125
Symptoms
Network connection failure – Unknown Session Manager error. Reacquiring connection…
Causes
Network connection failure due to unknown session manager error.
Troubleshooting and Resolution
If the problem continues, contact your Service Provider.
Fault code 126
Symptoms
Network access temporarily unavailable – please wait, the ThurayaDSL terminal should automatically reacquire a connection within 1-2minutes.
Causes
Network connection failure because network access is blocked.
Troubleshooting and Resolution
Network access is blocked. The network will send the ThurayaDSL a timer value, and the ThurayaDSL will attempt to connect again when the timer is complete. If the problem continues, contact your Service Provider.
Fault code 127
Symptoms
Network access blocked – Radio priority is less than threshold. ThurayaDSL terminal waiting to be unblocked by the network…
Causes
Network access is blocked due to the user’s priority.
Troubleshooting and Resolution
You are blocked from Network access due to your network priority. If the problem continues, contact your Service Provider.
Fault code 128
Symptoms
Network Blocked – GPS fix is too old. ThurayaDSL terminal will attempt to reacquire connection after receiving a new GPS fix.
Causes
Notification of a GPS fix during or after Network connection procedure.
Troubleshooting and Resolution
A new GPS fix is sent to the network that is more current than the one sent when the connection was acquired. The ThurayaDSL will reacquire the connection. If the problem continues and a new connection cannot be made, contact your Service Provider.
Fault code 129
Symptoms
Network access blocked – GPS location may be too old. If condition does not clear, please obtain a new GPS location.
Causes
GPS fix may be too old.
Troubleshooting and Resolution
Verify that the ThurayaDSL has an open view of the sky to get a GPS fix. If the problem continues, contact your Service Provider.
Fault code 124
Symptoms
Network connection failure – Invalid transaction id. Reacquiring connection…
Causes
Network connection failure due to invalid transaction ID.
Troubleshooting and Resolution
If the problem continues, contact your Service Provider.
As a satellite travels over the horizon, calls are handed to adjacent spot-beams; this occurs approximately every fifty seconds.
For a reference, A satellite only stays in view for seven minutes at the equator. This means that during a phone call at the equator, a call will be handed over to a new satellite every 7 minutes.
When the satellite disappears from view, an attempt is made to hand the call to another satellite. If no other satellite is in view, the connection is dropped. This may occur when the signal from either satellite is blocked by an obstacle.
When successful, the inter-satellite handoff may be noticeable by a quarter-second interruption.
The satellites are also able to transfer mobile units to different channels and time slots within the same spot beam.
Capabilities of Iridium Maritime data services ( Pilot, Open Port ) :
 D5 Creation | Powered by: WordPress